Here Comes the Garden Plan!

I published this post two years ago and thought I’d pull it out and share it again for new readers who might have missed it. As the post reads, for $25 a year Mother Earth News gives you the ability to graph out and print, share and post your garden plan. You can change it as much as you’d like and they send you regular garden chore reminders.  I’m finding that this year we are way behind many of the recommendations that Mother Earth News and gardenplantingcalendar.com have sent me because of our cold and snow. Maybe our weather will catch up with the calendar soon!  As a side note, this Mother Earth News planner also works wonderfully with a group of people who are planning together using a smart board or computer. The men and women at Bass River, Inc enjoy identifying all of the things they would like to plant and using their hands to place the plants on our virtual garden site. It’s definitely worth the investment. Let’s get planning!

One of my very favorite things about winter is thinking about the garden plan.  Yesterday I spent some time poking around the internet looking at planning websites and found this great service at Motherearthnews.com. For a thirty day free trial ($25/year after the thirty days),  you can design your garden space using lots of cool features.  The site uploads plant lists for your climate. Then you can determine your square footage and add all of the beds, structures and plants that you’d like. You can share it on social media, publish it, view it on your phone and print it.  I used the video tutorials that are provided to get started and before I knew it I had created this complete map of my kitchen garden.

Here is the link directly to the vegetable garden planner which I happened upon when I googled “garden plan.”   Just a side note about the Mother Earth News web site,  that’s a wonderful resource too! There’s lots of great information about gardening, sustainable living and health. I could spend days just reading and gathering ideas and information there.  Here’s the link  to the online version of the plan just above. You’ll see the plant list that comes with it just below the plan.

As I finish typing I can hear the ducks down in the pond for the first time this year.  Spring really is right around the corner!

If you create a garden plan, let me know, and I’ll share here on The Salem Garden!

Enjoy everything!

Michele

*This is not a paid endorsement, I have no connection to Mother Earth News, I just liked it  ;)*

Gardenplantingcalendar.com – Your Personalized Garden Planting Plan and a Free Giveaway!

It’s the beginning of a new garden year and just as I started to think about this year’s garden I was invited to try this website;


With a few clicks of my mouse I was hooked!

Gardenplantingcalendar.com will help you plan a wonderful garden. The site considers your local weather conditions and the needs of your seeds and seedlings, then provides a coordinated planting schedule.

How cool is that?

If your wondering about when to start tomatoes outdoors or indoors, you’ll have some guidance.

Maybe your pondering the possibility of growing potatoes in March?

Perhaps your a little nervous about just which week is best for planting your first row of lettuce.

Figuring out when to plant each type of seed or seedling is a big job.

Using the US National Oceanic and Atmospheric Administration (NOAA) “Climate Normals” Gardenplantingcalendar.com takes care of that for you!

You simply enter data about your location, the fruits and vegetables that your hoping to grow, and your preferred growing methods.

Immediately after answering the questions your garden calendar will be ready.

I actually cut and pasted each week of the plan onto my google calendar so I could keep up with the tasks and plan each one in to my schedule.

Needless to say I’m feeling super organized and ready to go!

I can’t wait to plant seeds and I’m sure that this little boost of organization is going to propel me right into the greatest garden season ever!

So now for the giveaway;

I will be giving one reader a premium subscription to gardenplantingcalendar.com. Just say hello in the comments section by Thursday evening at 6pm eastern time and your name will be entered into my random drawing! If you go beyond a quick hi and talk about how you’d like to use the calendar I’ll add two entries.

If you can’t wait for the giveaway winner to be announced to subscribe, use the coupon code  salemgarden20  to save 20% off of a standard or premium subscription.

Gardenplantingcalendar.com is going to be a great way to get this garden season started!

Check it out and leave your comment today!

Michele

PS/ Please feel free to share this post widely! Thanks!


It’s Not Too Late to Plant a Few Bulbs….

Maybe your feeling kind of done or like  you’ve missed the window to get those bulbs in the ground….

…but guess what? You haven’t!

As long as the ground isn’t frozen you can still plant bulbs.

And in a few short months when spring springs you’ll be glad you did!

IMG_7542
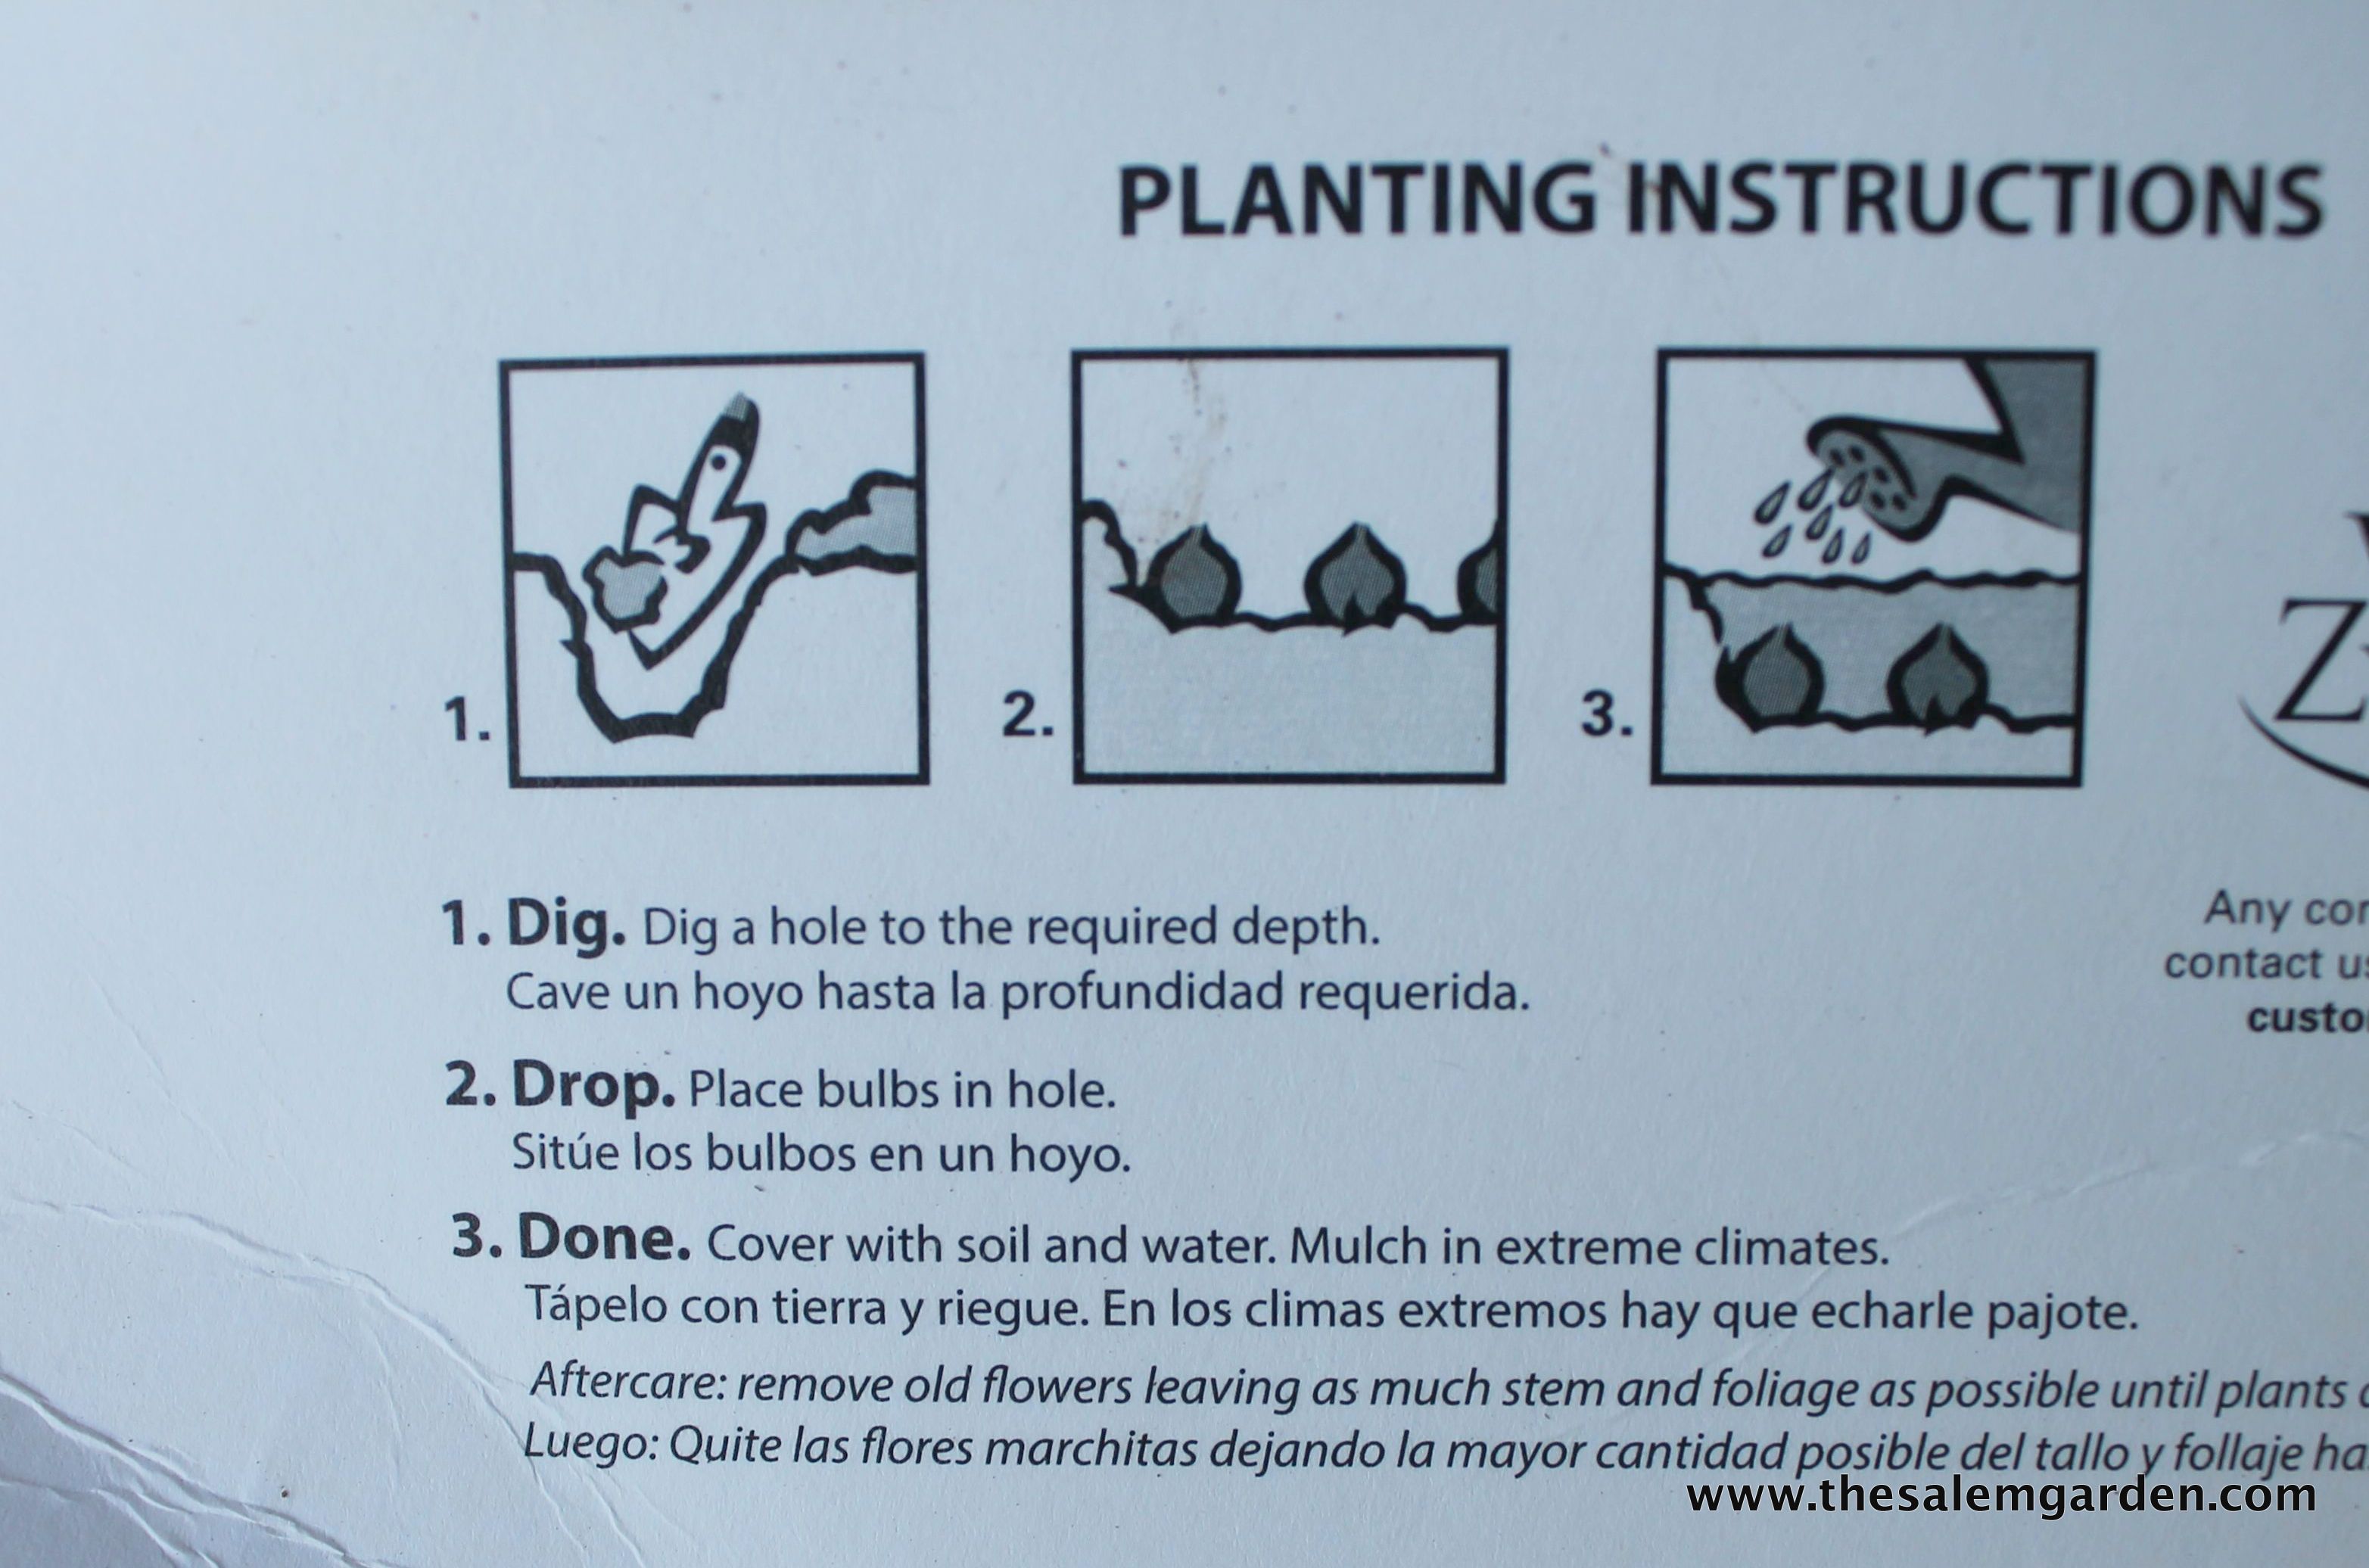
I decided to put some daffodils and dutch iris along this little walkway in my herb garden.

IMG_7543I used simple bags of bulbs from a big box store. You can be fancy and order them, or buy organic or whatever you like… or, you can just go buy some up the street like I did.IMG_7560Here’s the key.. Read the label and plant as directed. Be sure to take note of the planting depth and light requirements.

Considering the light requirement is so important, just like it is when you plant everything else!

The correct light, soil type and water, that’s what does it!IMG_7551I like to loosen up the soil well then place my bulbs a few inches apart.  IMG_7555Next I dig holes to the depth indicated on the package and gently place the bulb in, pointed side up. In this case the daffodils are planted six inches deep and the iris 2-4 inches. I’ve also seen gardeners layer them with the deeper bulbs sitting under a layer of soil with another layer on top. I was working in and around the herbs so I planted them randomly but if your grouping them together to fill in an open space they’ll look great if you use the layering method.

Does that make sense? I hope so…

You can add a handful of bonemeal as you plant if you have some. I didn’t have any on hand but it helps!IMG_7556
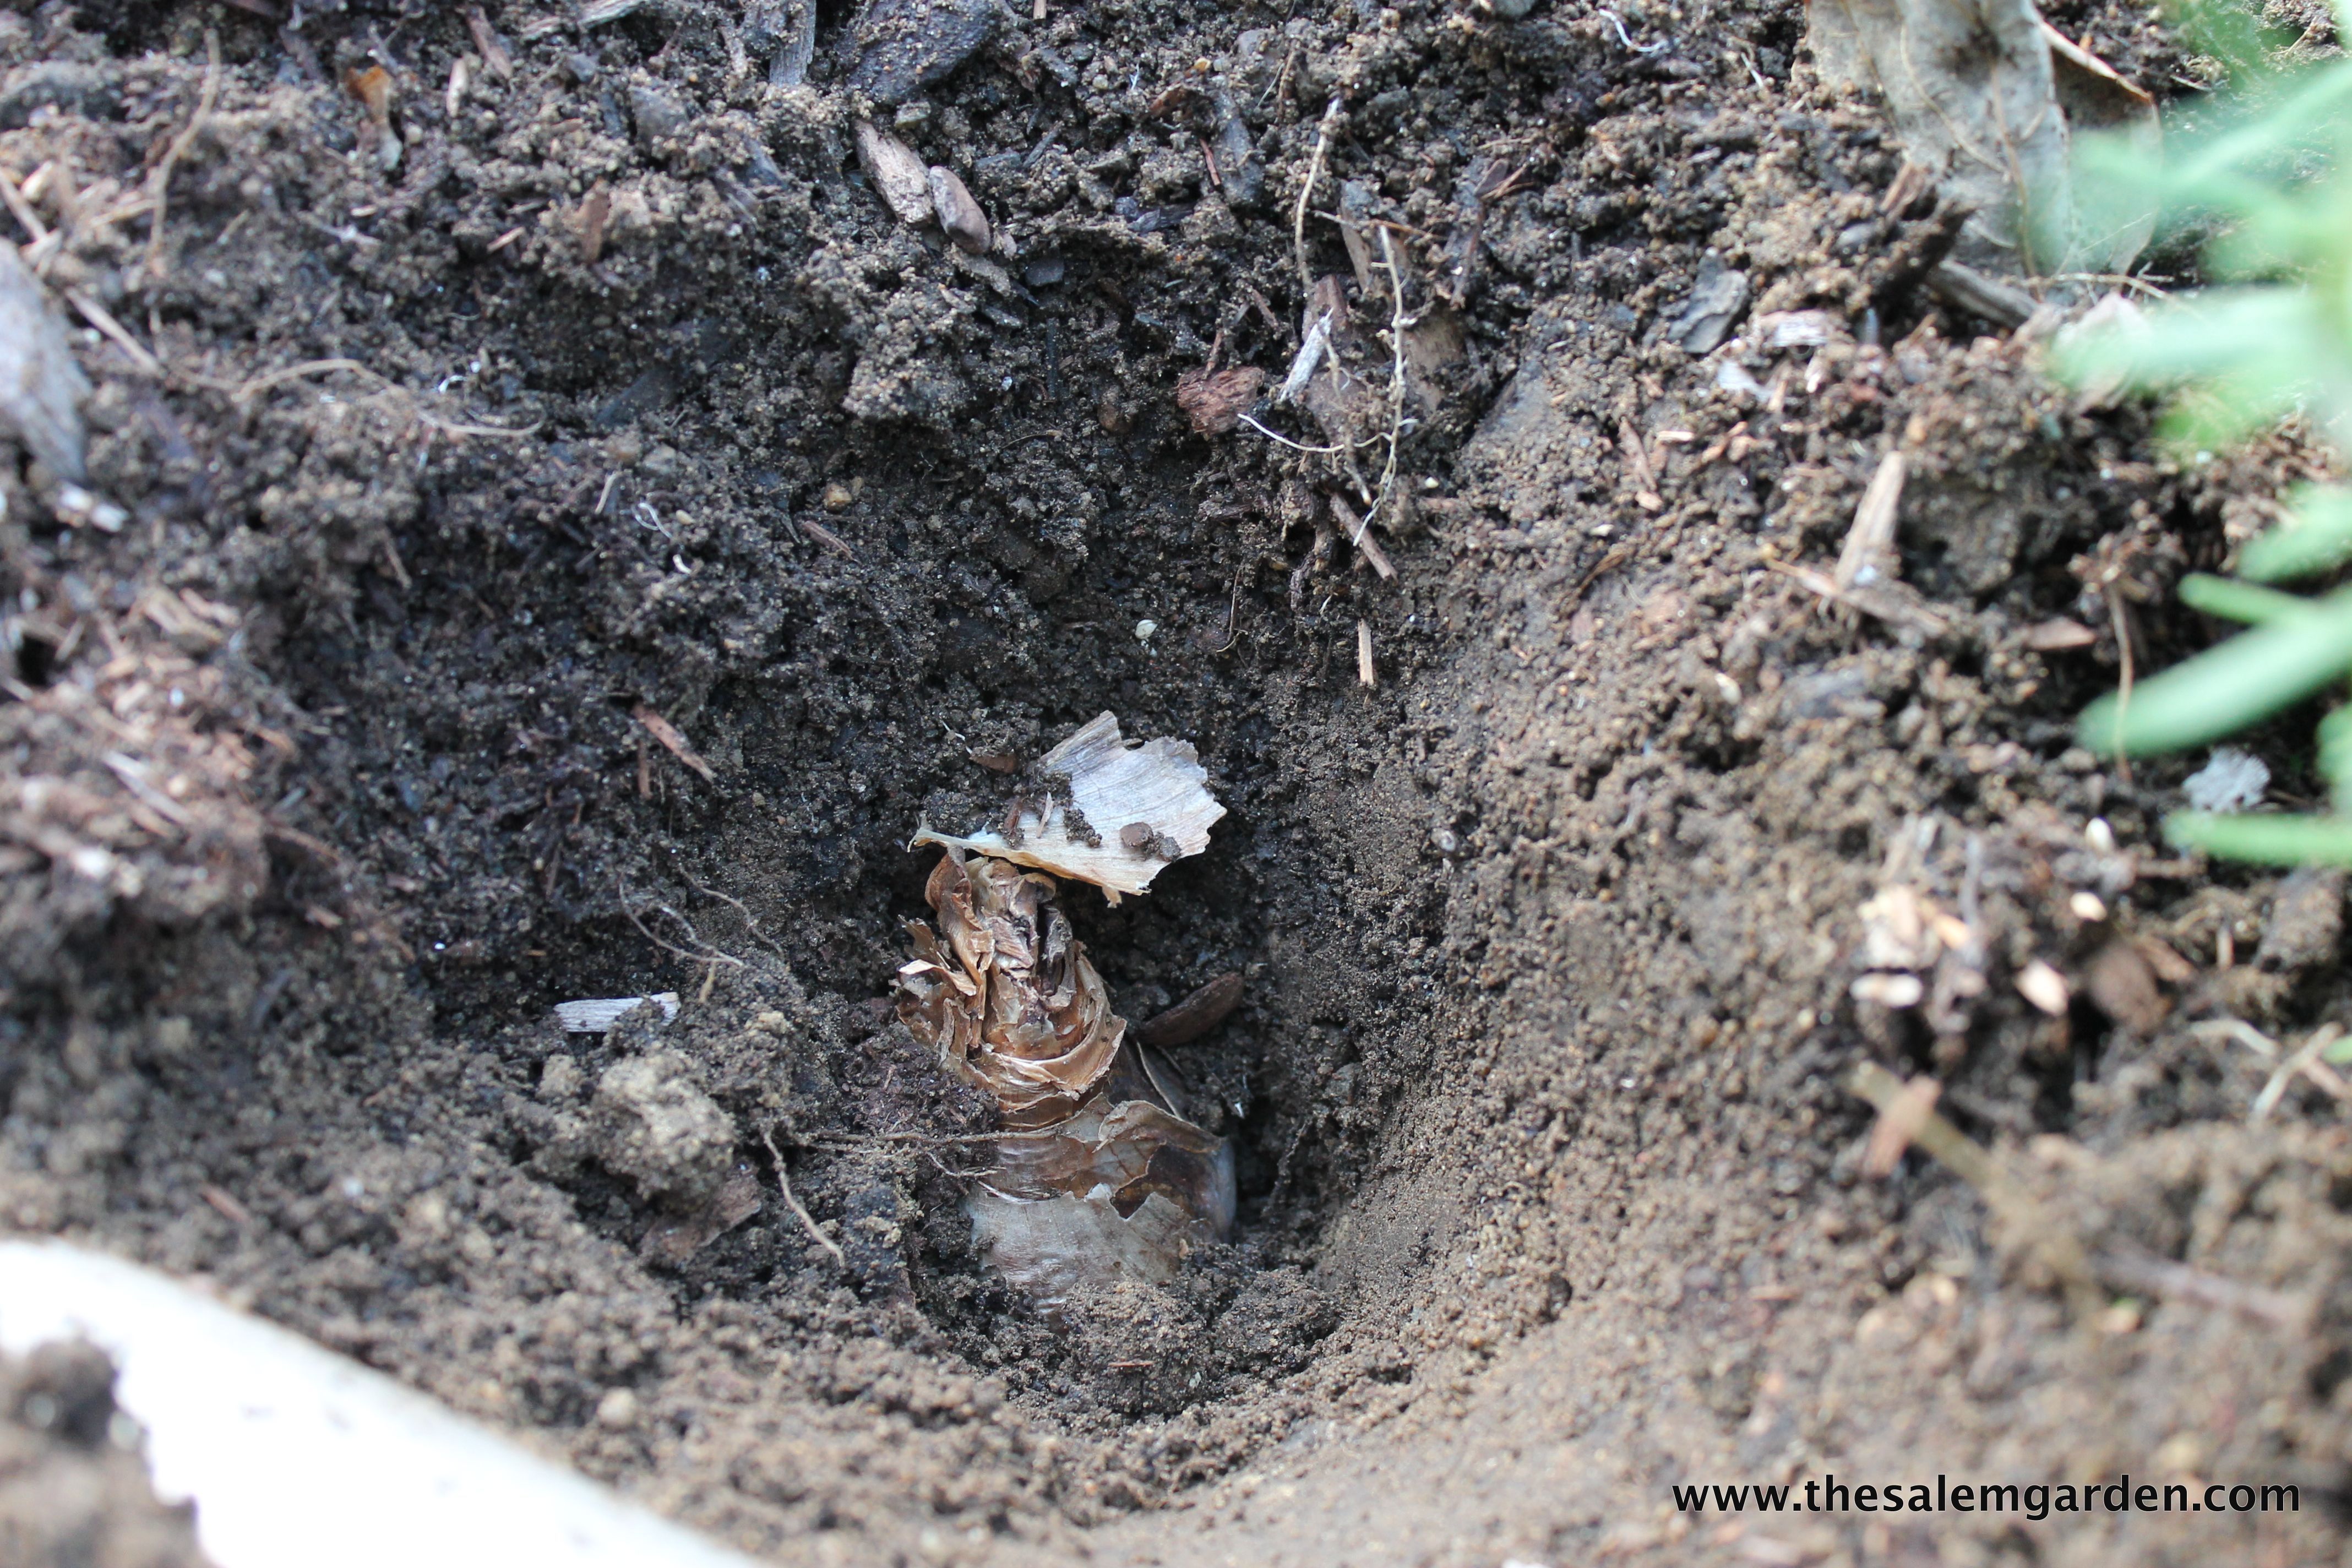
Fill back in with soil, and their all set!
IMG_7557I chose to scatter bulbs along the sides of this pathway, in between and around the herbs. Most of the herbs are perennials so they should be part of the arrangement when spring comes.
IMG_7547And now we just wait!

One last quick tip… don’t add manure of any kind to a bed where your planning to plant bulbs in the near future. Some lighter compost will be fine, but manure will burn your bulbs and you’ll never see them again.

Let’s just say that I learned this lesson the hard way 😉

Hope your inspired to grab a bag of bulbs off of the sale rack and spend a few minutes brightening up a corner. Look for a spot near a doorway where you’ll enjoy them often!

Hurry, before the polar vortex sinks down and gets us all!

Enjoy everything!

Michele

ps/ Since I wrote this post this week the weather systems have ramped up and the snow is coming, so I’m clicking publish and telling you to hurry! You can do this!

Rooting Coleus

Here’s what we were up to at Bass River last week! Michele

bassrivergarden's avatarBass River Gardens

image

The coleus plants were so pretty  that we wanted to save some for next year.

image

This one is nice!

image

We cut some off of the plants and trimmed off the leaves.

image

We put one in a clay pot with water.

image

Some of the cuttings are in a clear glass jar with water.

image

We put some in a mix of half perlite and half potting soil.

image

We even put one in a bottle!

image

Now their all sitting together in the sun in our kitchen.

We’re looking forward to learning about which coleus cuttings grow roots first!

Photos and text by Barbara, Laurie and Michele

View original post

What’s Eating the Petunias?

Hmmm…IMG_7042Do you see chewed up flowers on your petunias?

IMG_7043 They look like this..

IMG_7044
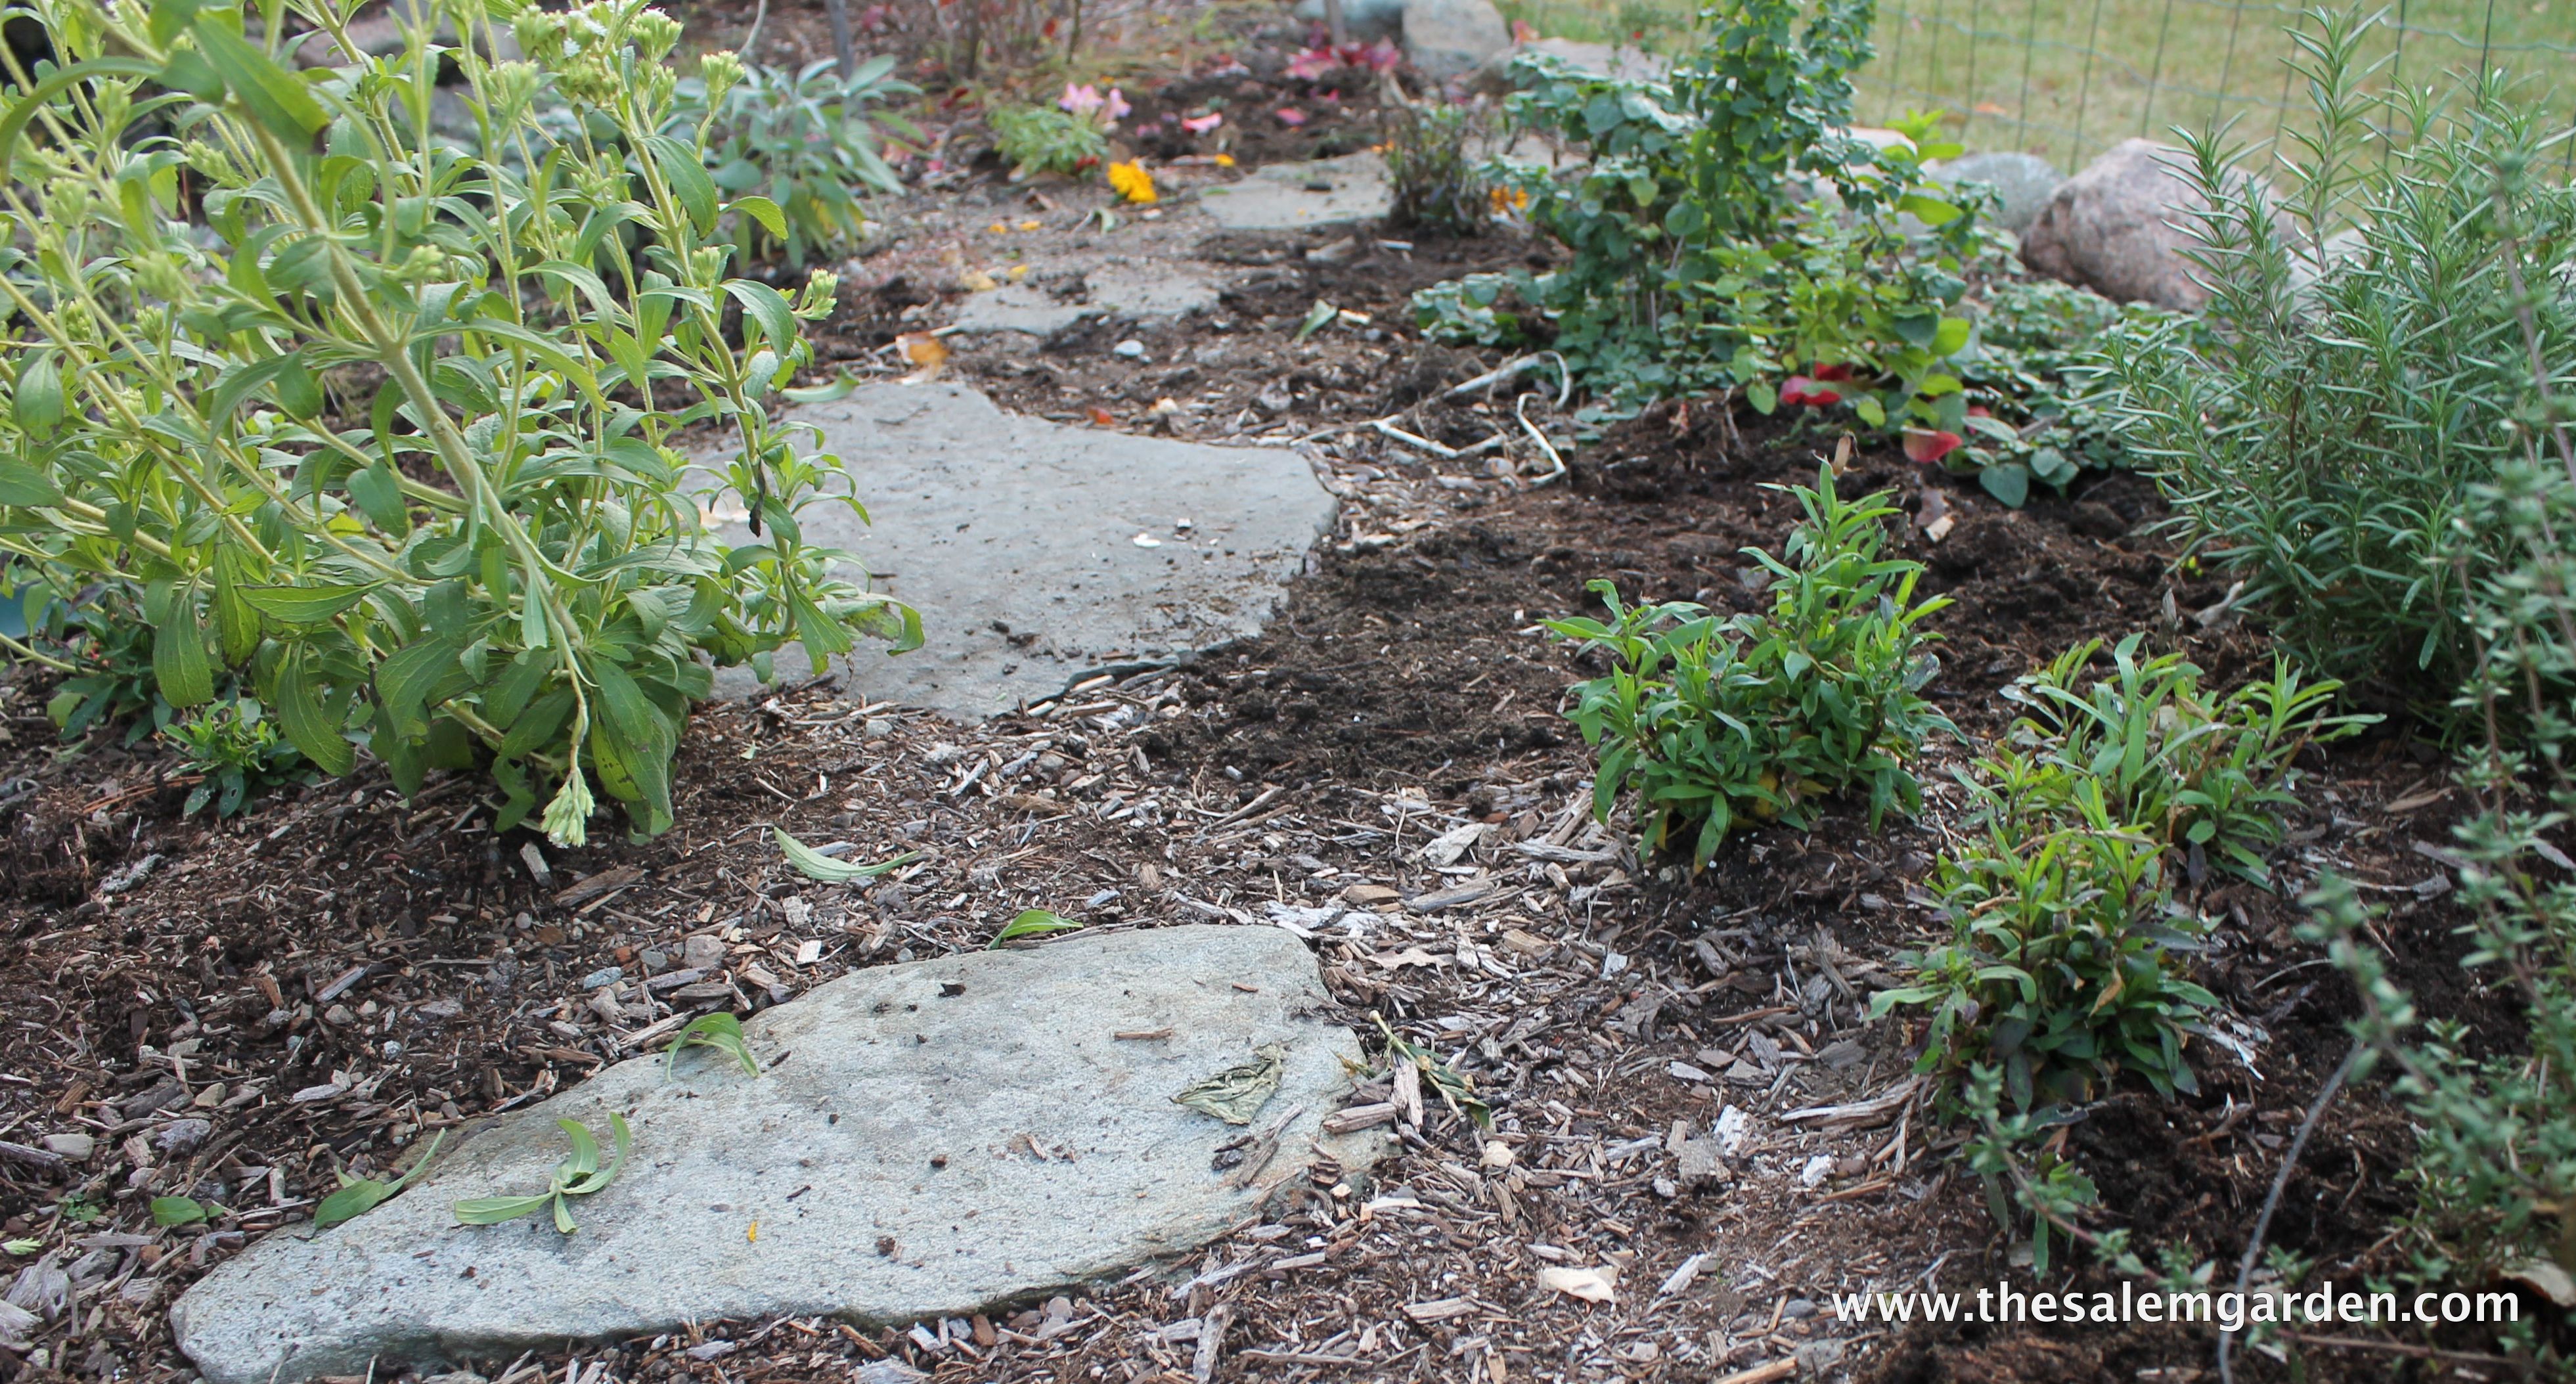
And in worse case scenarios, like this… Yikes!

IMG_7041 Here’s the culprit… the green hornworm.

They can be very tiny and they’ll try to blend in with the stems and leaves. You have to look carefully to see them but their there, munching away.

Just pick them off and give them a little smoosh and your petunias will start to come back. There’s usually just one or two per plant.

IMG_7046This pot of lemon ice petunias has been beautiful this year. I’ve been watching closely for the “petunia worms” as I call them. I think I caught them in time. I’ll keep you posted.

Don’t be shy, pick them off and smoosh! You can do it! It’s simple!

I’ll be on the road this week but checking in from our family vacation on Cape Cod :)!

Enjoy everything!

Michele


Foolproof Cucumber Seedlings- You Can Grow That!

The other day I blogged about the fun I’ve had this year with growing tomatoes. I’ve been in kind of the same mode with cucumbers (and pumpkins, and squash, and peppers, and several varieties of flowers). There’s a background story to my seed starting obsession that I have to share. In February one of the women who I work with in my job as an adaptive gardening specialist at Bass River approached me with a package of cucumber seeds that were dated 2011 and asked if we could grow them. I thought that starting them successfully was a long shot but I also saw the challenge as a chance for a fun learning opportunity. We decided to plant some of the seeds in pots of seed starting mix, and to try to germinate another group on a damp paper towel in a jar. Within a few days we had a jar full of cucumber sprouts that were flourishing. The seeds planted in the soil never did germinate, not one. We transplanted the sprouts to a container of soil and now we have little cucumbers growing on a trellis in a sunny window. So, we concluded that a little bit of humidity goes a long way in sprouting seeds and even older seeds might respond to this special treatment. I’ve been reading a lot about adding humidity to help the germination process and I brought the idea here to my home garden.  I’m growing all kinds of things in plastic bags and jars!

Here’s a step by step description of my easy foolproof way to grow cucumber seedlings:

IMG_5338I start with a paper towel, a clean jar with a lid, a water spray bottle, some tape and a package of seeds.

IMG_5343I dampen the paper towel and spread the seeds evenly over it.

IMG_5345Roll it up gently…

IMG_5346and place it in the jar and close the lid.

IMG_5354Then I mark it with a sharpie or as in this case I tape the seed package to the jar.  I did this on April 25th, remember that date!

IMG_5355Here’s what I found when I took them out on April 29th. These are a little bit overgrown, they could have come out of the jar on the 28th or even the 27th.

IMG_5357I gently placed well moistened seed starting mix in cups with a hole punched on the bottom… I don’t usually use paper cups but I had these on hand and the seeds needed to be transplanted right away.

IMG_5360I dug a little hole and placed a seedling in each container with the root facing down,

IMG_5362and just barely covered it with soil.

IMG_5363I put the cups under the grow light,


IMG_5432
and here they are on May 3rd. The first leaves are sprouting and the second set is close behind!

They would be ready to go out in a few days if our last frost date were closer. Unfortunately it’s not quite time for tender plants to be planted outside here on the New England coast. I’ll move them out from under the light when they get a little bigger and keep them in a sunny window for a few weeks. When transplant time is close I’ll put them outside in a protected spot for the daytime hours for several days to harden them off (help them get used to outside temps) before I plant them in the garden.

Just to summarize the dates; I started them on April 25th and eight days later their well on their way. That makes the turnaround time from putting them in the jar to being garden ready about 12-14 days.

Guess what that means? You have plenty of time to do this! And it’s easy, and I dare say it’s fun!

I hope that you get some seeds started soon!

Remember, you can grow that!

Michele

Displaying ycgt_web.jpg

“You Can Grow That” is a website hosted by garden blogger and author C.L Fornari which was created to widely share the message that plants and gardening enhance our quality of life. On the fourth of each month garden bloggers participate by publishing a “You Can Grow That” post. The hope is to create a national conversation about the benefits of gardening and to encourage people everywhere to participate in and experience all of the joy that the garden brings. Be sure to visit the “You Can Grow That” website to learn more about this wonderful effort and to find links to other bloggers’ posts.

A Few Thoughts About Growing Tomatoes From Seed

I’ve really gotten in to starting seeds this year. I have three varieties of tomatoes growing (Rutgers, Matina and Supersweet 100) and I think it’s safe to say that their doing quite well.  I spent a lot of time reading about seeds over the winter so I’ve approached the project from a different knowledge base this year.

I’ve made a few simple adjustments:

–I started the seeds on damp towels in sealed plastic bags and planted them in seed starting mix as soon as they germinated. This is one of my new favorite approaches with seeds of all kinds. When I visited my friend Betsey (the onion lady) in January she showed me that her husband often starts “harder to germinate” seeds in plastic bags. I’ve also experimented with forcing germination at work lately with great success. Betsey recommended a blog called Tomato Dirt  and as I read over their many tips for growing tomatoes from seed, I’ll be darned, this method was mentioned again. I tried it and the extra humidity got things going and before I knew it I had beautiful seedlings that had been transplanted into potting soil.

–I’ve kept the lights very close to the plants, about two inches above the tops of the seedlings. This keeps them from getting leggy and encourages them to grow stronger and sideways, rather than upward and spindly.

–I’ve brushed them gently with my hand once a day which also encourages a stronger, stockier plant.

–The lights are on a timer, twelve hours on, twelve hours off.

–I used one florescent bulb and one plant bulb in a regular shop light.

–I water from below encouraging strong root formation.

–I used seed starter containing vermiculite to encourage root formation.

–I talk to them, love them and spend time with them as I work on other projects.

I’d be growing well too if I were these tomatoes!

IMG_5369

Here they are today. I’m thinking about moving them away from the lights and up to my sunny office, maybe even into larger pots.

Are you growing tomatoes this year? How’s it going? Share your tips in the comments!

and of course, enjoy everything!

Michele

Square Foot Onions, and a Hint of Rhubarb

Recently these beautiful onions that my friend Betsey has stored in her basement inspired me to get serious about planting my own.

WP_000521Please pardon the quality of this photo which I took with my very unsophisticated non I-phone. I just wanted you to get the idea. Aren’t they amazing? This was in January no less!

I bought a bag of onion sets and after doing some research I decided to maximize my space and plant them using the square foot method.

I haven’t intentionally square foot gardened before but I thought that onions might be a good crop to try with. The concept behind square foot gardening is to grow as much as is feasible in one square foot of space using optimum soil and raised beds. It takes some planning to be sure that plants have enough space for root development and air circulation.  The rule of thumb seems to be that large plants need one square, while smaller plants can be planted more densely. The recommended square foot spacing for red onions is nine per square foot, so nine it is!

IMG_5215I started with my package of onion sets and my tape measure.

IMG_5214Next I loosened the soil (which had been thoroughly turned over this past weekend and well composted last fall) and using my tape measure, I very unscientifically, and quickly, and without painstaking accuracy, because that’s how I do things, divided the end two feet of my bed into eight one foot squares. I used my trowel to make lines in the soil.

IMG_5220Then I placed each bulb in to the soil, three inches apart in a grid so the bulb was just below the soil with the top pointing up. The top of the bulb is the pointy part that you see here, while the bottom where the roots develop, is flatter and usually has a slightly rough texture.

IMG_5219Some are sprouted already. I think that’s fine.

IMG_5223Here’s my finished grid. My research tells me to make sure that they don’t dry out too much but that they’ll resume growing again if they do. I’ll keep you posted!

IMG_5225In other news; the rhubarb is peeking through! I wish I liked it more. I’ll cook and bake it for Michael and I love to give it away. It looks so pretty in the garden when it gets big. Rhubarb has so much going for it, I think it’s just the tartness or texture that I personally struggle with.

Anyway, grab a bag of onion sets at your local garden center and plant them in your well fertilized eight square feet of space and let me know how it goes!

Enjoy everything!

Michele


For the Lady I Met In Walmart Yesterday…How To Start Your Garden

Hi there!

I heard you ask for help yesterday in Walmart and spoke with you a few minutes later and told you a little bit about my blog. Since then I’ve been thinking  about how I can help people like you who are just starting out with their very first garden and I came up with a few simple ideas. These are my thoughts after talking with you for just a minute or two.

—You said that your garden will be next to your driveway and you want some things growing and some color. I didn’t say it, but I should have said that you would want to dig down 12-16 inches to loosen the soil really well. If you just scratch the surface it will be tough for the roots to grow and establish themselves.

—Then, see what kind of soil you have. It may be nice topsoil (black, brown and crumbly), or sandy (light colored and very fine) or clay like (sticks together in a clump when it’s a little wet). It may be very rocky (try to take out as many as you can), or not. Adding compost that you can buy in bags from garden centers will help improve most soil. If you have an extreme version of any of the above you may need to work at it a little bit more. Here’s a link that can help you with that.

—As you work on getting the soil ready watch the way sun shines on the space. How many hours of sun the garden gets is really important in choosing plants that will do well. It might be over 8 hours a day (full sun), 3-6 hours a day (part shade) or less than 3 (shade). Match the light requirement on the plant tag with the type of light you have. It’s really important to do this!

—Look for plants that will fit the light requirement and the type of garden that you have in mind. Read the labels again to get an idea of how tall the plants will be and when they’ll bloom. Some tags even tell you what to plant together which is really handy when your first starting out!

—Try to arrange the plants so that the tallest are in the back and shortest are in the front.

—Pull the weeds as you see them pop up. If you do this for a few minutes every day you’ll be able to keep up with them easier.

—Watch the weather and be sure to water if it doesn’t rain.

—Take off dead flowers and leaves so that new ones can grow.

—Leave me a message here if you have any questions. I’m happy to help if I can!

— Most importantly, enjoy it! Don’t worry too much if plants don’t make it, it happens to all of us! You can do it!!!

Michele

ps/ Other gardeners, feel free to chime in with your ideas and suggestions in the comments section.

Let’s help this lady have the best first garden ever!

English: Soil types by clay, silt and sand com...
English: Soil types by clay, silt and sand composition. (Photo credit: Wikipedia)